
If you would like to watch the video showing the entire process, click Here
There’s 150 videos on how to clean your Glock and I’ve cleaned Glocks in many different ways over the past 20 years but what I decided to do is go and look at the official way that Glock says to clean your pistol. So what we’re going to do is go through each of the steps that Glock says.
This is not necessarily what I’m recommending but it’s what Glock officially says and you can take it from there. In fact, there is a little bit of leeway here and there with solvents and oil but Glock is pretty particular about certain points. We’re going to look at each of the ways not only to clean but to also lube and then do the Glock inspection of your pistol.
This to me is very helpful for new gun owners but even us old salty guys that are old Glock fans can learn a thing or two. We’re going to be using the Glock 26 but this applies to all models of Glock no matter what caliber no matter what frame size. Now here are the items that I have for the cleaning project.
I have a cleaning rod and of course a jag for patches and a bore brush. You can use a bore snake as well. Then we have a toothbrush of some sort. This is definitely for gun cleaning. I have some q-tips and these are just long which you can use standard regular q-tips. Patches, a little bit of gun lube, some solvent, a rag and something to put it on at least something you don’t want to harm like a kitchen table when you want to have something you want to put down. This is just a little lineman cleaning pad or station. So first thing we’re going to do, we have the magazine out we’re going to double check make sure the gun is unloaded checking visually checking the chamber and we can see that it is clear.
One of the things I want to note before we get started is I know a lot of guys on YouTube we do this a lot checking our guns and it’s very important you get in that habit. It’s a discipline that you really need to do. More gun accidents happen when you’re cleaning your gun because a lot of people feel like the gun’s unloaded they remove the magazine and there’s one in the chamber and there you go.
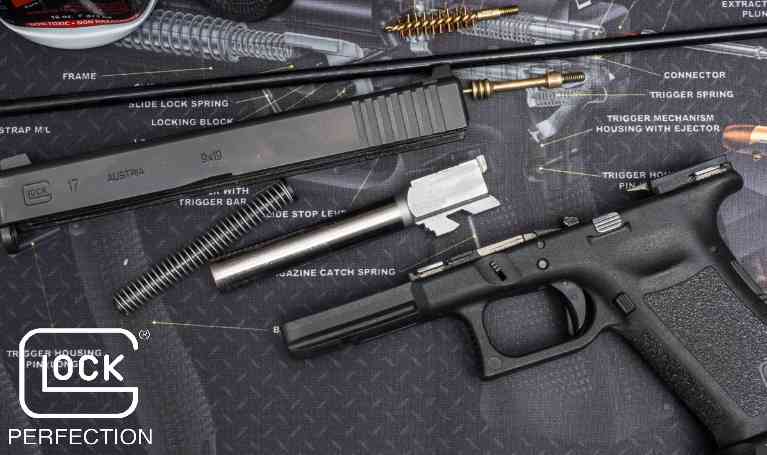
So first and foremost definitely check your firearm. Next we’re going to disassemble so pointing it in a safe direction pull the trigger pull down on your tabs about a block says a tenth of an inch and then it just comes right off and we’re going to separate our recoil spring guide rod and our barrel. There are four parts to your Glock pistol your slide your frame your barrel and your recoil spring your magazine we’re going to also take a look at that as well but those are these are the main four parts that you’re cleaning.
We’re going to start with the barrel and of course that gets the most dirt and grime and of course lead build up and powder and all that kind of stuff. Now we’ve got a bore brush on our rod and we always go from the breech in first you don’t want to nick the front of your barrel the muzzle of your barrel and we’re going to take this is dry and we’re just going to kind of clean out all the fouling go through about six seven to ten times just according to what your preference is according to how dirty it is okay once you get that clean you can just kind of inspect to see where you are.
Now, we’re going to take off the brush slide your patch through we’re using some hops number nine solvent. I’ve been using this stuff for 30 years it’s great stuff. You don’t want to get too much of the solvent on your patch so wringing it out some is smart. We’re going to take this and just run it through. This is going to dissolve a lot of the lead it’s going to get rid of it’s going to allow it to kind of come off. You want to go through a number of times, you definitely want to get your chamber and again kind of spin it as it goes through the bore brush. This will get a lot of the fouling out but usually when you’re using full metal jacket it really helps to keep the leading down.
Now we’re going to take this off we’re going to take another patch and we’re going to put just a little bit of bore solvent on there and we’re going to make sure that there’s no buildup on the barrel so we’re just going to kind of wipe it down. One thing you want to pay attention to is your feed ramp right here and you can see how dirty that is but shooting a lot of rounds through here it really can get messy. Now we’re going to take our cloth and we’re just going to wipe it down you want to get all of that solvent off now it will evaporate so you don’t have to really worry about it.
Next we’re going to take a dry patch and we’re going to run it through the bore getting any kind of fouling out making sure and getting that solvent out of there. You want to run patches through until they’re just clean when you pass them through and we look down the barrel and it looks nice and clean and shiny. Now the barrel is pretty much clean we still need to add lubrication we’ll do that in a minute.
We’re now going to clean the slide. Glock recommends taking a toothbrush with a small little patch and just kind of push it onto the patch and just start cleaning the rails. That’s one of the big places to get and so just go inside your slide rails get all the debris out and then get the top of the right here on the back part of your slide. Now you can see right away that it’s getting a lot of fouling you want to get the top of your slide as well this pretty much just gets all the debris and the fouling and residue out from your slide. Now i did bring out some q-tips, this is not necessarily for the Glock recommendation but i like to get those areas with the slide rails with q-tips. You can get it with that brush and the patch but as you can see there was left over in those crevices.
Now one thing that you will see sometimes is a copper kind of lubrication or copper wash that’s inside a brand new gun and that is made for long-term lubrication. You don’t want to remove that you want to leave it in because it actually helps for the break-in period of the gun. I know a lot of people wonder what that is but that is to be left in tact. It is from the Glock factory and as you can see we got quite a bit even after cleaning with the brush and the patch. now one of the places we really want to pay attention to is the breech face and the extractor right here on the left holding the muzzle end down. When you clean it keeps the debris from getting into your firing pin channel so just holding it in this down position and just wiping it of course then taking a look and inspecting it. Then continuing on also getting the extractor right underneath to make sure there’s no debris there next we’re going to clean our recoil spring and guide rod.
Just brush and get any kind of debris off there that build up. When you fire the gun there’s a lot going on with your recoil spring and guide rod so just keep it good and clean mainly from debris, then we’re just going to wipe it down. Next is our frame, again take your brush just clean areas especially right in here with your trigger bar your locking block also the inside right here of your frame. Make sure there’s no debris or anything there and this will just remove a lot of that residue getting up under your slide rails. The cruciform in the back you can clean down into your mag well just getting your brush down there making sure there’s nothing.
A lot of times you pick up mags off the ground, load them and dirt things like that can get in here. Glock also recommends that if there is buildup debris and residue on the inside of the frame you can take just a little bit of solvent on a patch and just hit the high areas and these are the metal areas that have a little bit of buildup and you can just touch them up. As you can see we’ve got some. once you get that taken care of then you need to get that completely dry so we’re going to take a cloth and we’re just going to wipe this down. Use very little solvent, you need to make sure that it’s completely dry before you reassemble and we’re done.
Now clean your magazine right here is a little tab you push that in and then right here on the sides there are little catches on either side and you need to depress it. Some people can take their thumb and forefinger and push, i have a little more trouble with it so i’ve got a special tool i use but you can do it that way. I got this from Brownell’s, this little tool is invaluable especially if you’re cleaning a number of different magazines. So we get the tool and press and then I’m just going to pull the base plate. Let me get it started then we can pull it off get your thumb over the spring the magazine spring and let it come up. The big thing here is you want to clean the body of your magazine with a brush any kind of debris or fouling that might be in there. Make sure the spring is just clean the follower and the inside of your base plate and retaining plate. I’m just going to wipe the spring down and just for any kind of debris that might have missed it with the brush. No lubrication or solvents are necessary when you’re doing this but if you do use any kind of lubrication or solvents make sure that it is completely removed with a cleaning cloth before you reassemble. One of the things and it has a lot to do with the lubrication is anytime you leave oils or lubrication or solvents they can build up a lot of grime and powder residue and things like that and cause issues with your firearm. Now we’re going to reassemble, slide your magazine in base plate retaining plate and just put your base plate back on there we go it’s a lot easier to reassemble than it is to disassemble.
Now that we have the gun clean we’re going to add lubrication. A couple of things about lubrication; Glock recommends using very little gun lube and if you do you wipe it down really well. That’s really important to remember because again, things can get built up in your gun that can be a problem. Now here are the points on the gun that recommend for you to lubricate and these areas once they’re lubricated you make sure that there’s not heavily lubricated. It’s a very light oil and use it in particular spots we’re going to use this hops number nine oil and just add a little bit to a cloth and we’re going to clean the inside of the barrel. We want to go through it a number of times and make sure that we’re picking up that oil and we’re going to run a dry brush or a dry patch through here when we finish. You can see we’re picking up a little bit of residue even after we’ve cleaned it with the bore. With the bore solvent now we want to run just a dry patch through it and again there’s going to be a little bit left but that’s all you need and it looks great on the outside of the barrel.
We’re going to add just a little bit of oil to the barrel we’re going to take our cloth and we’re going to wipe it down. There’s a lot of action that goes on with your barrel just make sure that there’s no oil left over. Again these guns run really well and so just a little bit of lubrication is fine. Also we’re going to put just a little bit of lube right here which is recommended right in here between your lugs. We’re going to take a patch and we’re just going to kind of get some of the excess out. One place we want to make sure we have a little bit of oil is right here at the top of the chamber because it mates with your slide. One of the things i want to just go ahead and demonstrate here is how the barrel tilts down and you can see it rubs right there on the slide and so we want to make sure that the oil penetrates the metal but not too much. So we’re going to put a little bit of oil on our patch and we’re going to rub that area. Particularly we also want to check to make sure our feed ramp and the beat breech face is clean. Now we just want to wipe it down on the slide. We want to get the top right here of the slide and this is where the barrel comes in contact. I’m going to take our patch and we’re going to just rub that making sure we get right on that edge again.
One place we do not want to get any oil is right here near the firing pin channel. Another place is right where the barrel touches the slide and comes through the hole. I want to give that just a little bit of light oil, I’ve got a little bit on the end of this q-tip. There’s a lot of wear that goes on that barrel. Now Glock recommends that we have one drop of oil pretty much for your slide rails and what I’m going to do, it says apply it to a patch but I’m going to apply it to this q-tip. I’m just going to rub those rails and just get a nice little film. Then I’m going to take the other side and come back and just give it a very light coat. Do the same for the other side you can see that we’re picking up still a little bit of debris and a little bit of powder but that’s because the oil has actually loosened it up some.
Now, Glock says one of the most important places to lubricate is right here under your connector where this little hinge comes up. It has a lot to do with the way that the trigger bar rotates under that and causes wear and so you’re going to want to put just a little bit of lube right there. So we’re going to just drop right in there and this will help when that rubs. Some of that lubrication will go down into the trigger housing but that’s okay, this is going to help make this a little smoother. Then we want to add just a touch of oil to the slide rails on the frame. We’re going to take our patch and just get any of the residue off and that’s all the lubrication we need to do to the frame.
Now we’re going to do the Glock recommended inspection of each of the parts. First inspection is to check the barrel look for any kind of bulges or cracks or any kind of obstructions. Look down the barrel just to make sure that it is clear. That seems simple but believe me, you need to check.
next we’re going to check the firing pin and right here on the firing pin lug we’re just going to pull it back and retract it and then let it go slowly back down. We bring it up retract it just seeing if there’s any kind of debris or any binding and it should go all the way back and then down. Next we’re going to see if the firing pin is protruding into the breech face and it’s not, It’s flush. Right here Is your firing pin safety, just depress it and shake the slide we should be able to hear the firing pin and we can now take your firing pin lug and push it toward the muzzle. To see if the firing pin will protrude right here and we’re not getting any movement now we’re going to take and depress the firing pin safety. Just push it down and then push the firing pin and we can see the firing pin is coming and protruding out.
Next we’re going to visually inspect the extractor right here for any kind of chips and make sure that is a straight edge. Also, look underneath to make sure there’s no debris. If it looks good and clean next we’re going to inspect the ejector. Right here is the ejector, we’re looking for any kind of cracks or anything and it looks to be just right checking for any kind of chips making sure that it’s clean. Now take your slide stop, bring it up make sure that it’s snapping down just like this. If it’s sluggish or if it’s not snapping down you have a problem, but here this is a good slide stop and that’s pretty much it for the internal inspection.
Now we’re going to do an outer inspection so we’re going to reassemble barrel recoil spring guide rod bring slide to slide rails function test and now we’re ready for the external inspection. Now I want to rack the slide of course making sure the gun is unloaded with the trigger you want to make sure that not hitting the tab but going from the outside of the trigger pull it. Just make sure that it’s not firing and then take your shoe and pull the trigger and it’s firing okay. Now we’re going to open it up and we’re going to check reset click the trigger pull back and we have reset. Do this a number of times; three to four times. Reset’s good, now magazine inspection. We’re going to look at the feed lips, make sure there’s no problems of course these are metal lined right here look for any kind of deformity. Everything looks really good now depress your follower make sure that it’s free and it’s flowing and it is, look at the exterior especially right here at the mag catch the base plate just make sure everything is in top shape.
We’re good to go now, Glock recommends that you do this complete process when you first buy your pistol and then every month or after every time you fire the pistol. That’s just per Glock recommendations. As far as magazines and the disassembly and inspection, they recommend three to four months. Unless there are other circumstances where dirt, ground, things like that and of course that has to do with your pistol as well. So it’s just up to your conditions you know it’s an overkill but that’s just what Glock recommends.
Again these guns will go hundreds of rounds without cleaning if not more than that. I’ve fired this one 1500 times at least before i did this cleaning and inspection so the Glock pistols are up for it. If you are carrying this gun as a concealed carry you need to definitely take a little more care with those pistols than you do with just your range guns. In fact, one of my good friends had a little pistol that i did a review on and he let me borrow it, I took it out to shoot it and it jammed right away. Once I disassembled it, it had lint built up all in the mechanism and once i cleaned it it ran like a champ. So when you’re carrying a gun, especially with all the oils and the perspiration. You know lint and things like that these guns can be contaminated and they can malfunction so just keep track of your Glock. If you ever pull this out and you need to use it you’ll want it to run like a Glock. So now we have the gun cleaned, lubricated and inspected and we’re ready to go to the range and then we’ll do it all over again.
If you’re interested in completely disassembling the slide the frame and also the Glock 43, which is a little different, I have videos up where I go through every bit of the disassembly process of the slide the frame and the Glock 43. Of course obviously you can go to the Glock website and look at this information yourself but sometimes it’s kind of fun to watch it on video. I’m not saying this is the way to clean Glock, I’m just saying this is the way that Glock recommends. How you do it is up to you but i guess Glock made the pistol so maybe they know a thing or two about how to clean it.
Be strong be of good courage. God bless America, long live the republic.
-Don